

Table of Contents
Adding notifications to your Home Assistant server can really help to take your automations to the next level. And, by having your home automatically notify you with an actionable notification, the whole system can feel just that much more futuristic. I’ve decided to write a tutorial to hopefully help those who want to get started with iOS notifications and then build up from there to ultimately add and use Actionable Notifications.
Basic iOS Notifications
This assumes that, 1) You have the Home Assistant iOS app (Home Assistant 2.0) successfully installed and connected to your Home Assistant server and 2) You’ve given Notification permission to the Companion app. If successfully installed, in your Home Assistant Server, under: Configuration > Integrations you should be able to see your mobile device listed as an Integration:

We can test the simplest form of an iOS notification using a service call under the Developer Tools, and using the notify.xxx (replacing xxx with your device id) service call to send a notification to your mobile device, with the Service Data:
{"message":"This is a test"}
When you hit the “Call Service” button you should see a notification pop up on your iOS device, like this:

In this example, using the notify.xxx service, the sent data only contained a message. In all notify service calls, the message: field is required. However, we can also add additional data when we call this service. Let’s look at some of the additional features we can add. Each notification can also contain a title and a subtitle:
{
  "title": "This is a title!",
  "message": "And this is a message!",
  "data":{
    "subtitle": "And this is a subtitle"
  }
}
Sending a notification with this data creates a notification that looks like this:

You can play around with different combinations of titles, messages, and subtitles. It’s important to remember that with each additional line you add, you need to add a comma (,) at the end of the previous line to ensure its valid syntax. And if there is only one line, then delete the comma. (Compare the first example with only message: and no trailing comma, to the second example with multiple lines)
Grouping iOS Notifications
Ever notice how notifications from the same app on your iOS device are grouped together? We can also add this to our notifications. Let create an example and show the difference between grouped and un-grouped notifications. We can group notifications by using thread-id: field and setting the value to an ID we would like. Lets send 3 notifications to 3 different group ID’s and see what happens:
{
  "message": "Notification Group 3",
  "data":{
    "subtitle": "Group Test",
     "push":{
        "thread-id": 'notification_group_1'
     }
  }
}

We can see that as the notifications ‘pile-up’ they stack according to set thread-id. This is helpful if you are sending notifications of similar types (i.e. alarm-system notifications) and want to keep things more organized.
There’s a few more features you can add to notifications, including sounds and app badges. You should be able to use the code from the previous examples as a starting point, and then check out the companion app docs to add the additional features.
Dynamic Attachments iOS Notifications
Okay, now lets add some more advanced features to our notifications. We can add ‘Dynamic Attachments’ to our notifications (dynamic-content companion docs). This can include sending a live map with a pin, or even a live stream to one of our camera images. We can test streaming a camera through the same notify.xxx service call, this time with the Service Data shown below, replacing the camera.xxx line with xxx being the name of your camera:
{
    "message": "This is camera test!",
    "data": {
        "push": {
            "category": "camera"
        },
        "entity_id": "camera.xxx"
    }
}
When we call the service, we should see a notification saying “This is a camera test!”. However, now, if we click on the notification, we should now also see a live camera feed load:


Testing Dynamic Attachments for iOS Notifications. Showing a (blurred) live camera feed
Actionable iOS Notifications
Now that we have a handle on the basics of iOS notifications, lets finish this tutorial and add actionable iOS Notifications. Actionable iOS notifications let us add buttons to our notifications which can be used to send back events to Home Assistant. In my opinion this is one of the most powerful features of the Home Assistant Companion app. An overview is available in the Companion app documents (https://companion.home-assistant.io/docs/notifications/actionable-notifications). However, I think it may be helpful to learn through an example. I use actionable notifications to send me alerts when the alarm is armed and a door opens, with the option to ‘sound’ or ‘silence’ the alarm siren. I will use this as my example.
Setting up Actionable iOS Notifications
First, we need to define and create a notification category. This can be done in the Companion app itself, or in our Home Assistant configuration.yaml file. I’d recommend setting it in the configuration.yaml file as I find it easier to back up. I will use my alarm notifications as an example notification category. The notification category information will all go under the ios:component. (If you don’t already have it, add it as a line in your configuration.yaml)
ios:
  push:
    categories:
      - name: "Alarm Control"
        identifier: 'alarm_notification'
        actions:
          - identifier: 'SOUND_ALARM'
            title: 'Sound Alarm'
          - identifier: 'SILENCE_ALARM'
            title: 'Dismiss Alarm'
Looks a little complicated at first, but lets break it down and look at each component. Once you have worked with one example, I find it easy to copy/paste and modify for additional implementations. Each notification category will require a name, identifier and list of actions:
- The
nameis a friendly name that will show up in Companion App. - The
identifieris a unique name (all lowercase, no spaces, no special characters), that will be used to tell Home Assistant and the Companion app which notification category we are sending. (We actually used a ‘built-in’ notification category in the previous example,"category": "camera", to get the live camera feed.) - The
actionscontain the list of buttons that will be attached to the notification. In this example, the text on the buttons is defined by thetitle:and therefore, will be “Sound Alarm” and “Dismiss Alarm”. The identifier within theactionsis what is sent back to Home Assistant and lets us use these actionable notifications in automations. More on that later. Also, you can add multiple actions here, it does not just have to be two choices like the example.
After defining the notification category in the configuration.yaml file, save, and restart Home Assistant. Then, go into the Companion App –> “App Configuration” –> “Notifications” and press “Import push configuration from server”. If you copied the configuration above, you should now see “Alarm Control” as a Category.


Okay, now for the exciting part, lets test our new Actionable Notification! Head back into the Developer tools, and send a service call to the notify.xxx service with the Service Data below, replacing the category: with the category you previously defined (if you copied my example, you do not need to modify this):
{
  "message": "Actionable iOS Notification - Alarm System",
  "data": {
      "push": {
          "category": "alarm_notification"
      }
  }
}
Call the service, and if everything is set up correctly, we should now see our actions appear with the notification! This type of notification will also appear on your Apple Watch without any additional configuration required – great!


Receiving Actionable Notification Events for Automations
It’s great that we can now send actionable notifications to our iOS devices, however, it would be a lot better if we could actually use them for automations. I’ve set my automations up in Node-RED. However, I will show how to use the Automation Editor as well (jump to that section: here).
Sending & Receiving iOS Notifications in Node-RED
So far, our notifications have been sent through Service Calls in the Developer tab — not ideal for automating. To send iOS notifications in Node-RED, use a “call service” node. The data in this node will be in the same format as the data used for the service calls in the previous examples:


Node-RED call service node and data
[{"id":"aad679b3.c91d9","type":"api-call-service","z":"6494c6f7.0a7108","name":"Alarm Notification","server":"","version":1,"debugenabled":false,"service_domain":"notify","service":"mobile_app_stevens_iphone","entityId":"","data":"{\"message\":\"Actionable iOS Notification - Alarm System\",\"data\":{\"push\":{\"category\":\"alarm_notifation\"}}}","dataType":"json","mergecontext":"","output_location":"","output_location_type":"none","mustacheAltTags":false,"x":470,"y":200,"wires":[[]]},{"id":"fc9b8452.78534","type":"inject","z":"6494c6f7.0a7108","name":"","topic":"","payload":"true","payloadType":"bool","repeat":"","crontab":"","once":false,"onceDelay":0.1,"x":290,"y":200,"wires":[["aad679b3.c91d9"]]},{"id":"e7f76522.c1a328","type":"server","z":"","name":"Home Assistant","legacy":false,"addon":true,"rejectUnauthorizedCerts":true,"ha_boolean":"y|yes|true|on|home|open","connectionDelay":false,"cacheJson":true}]Triggering this node will send the actionable alarm notification to our iOS device. Now, we need to set up a node to listen for events from our notification:
Set up an “events: all” node, and set the ‘Event Type’ to ios.notification_action_fired. This ‘Event Type’ will receive events from all iOS actionable notifications and therefore, to use it with specific automations, we need to filter the events. Connect a debug node, send the actionable notification to your device, and then select one of the actionable button choices. After selecting, you should see a message come through on the debug node:

Here we see the device name, and ID but most importantly the actionName:. This refers to the identifier: we set for the action: in the notification category. In this example, the “Sound Alarm” button was pressed.
We can use this to trigger automations depending on the button pressed. In the above image, selecting the ‘>_’ button copies the path to the value in actionName:, which is: msg.payload.event.actionName. We can use this in conjunction with a switch node to set up our automations, where we can trigger different outputs of the ‘Switch Node’ depending on the actionable notification button pressed:

[{"id":"fb121e7.ae2b4e","type":"server-events","z":"6494c6f7.0a7108","name":"iOS Action","server":"","event_type":"ios.notification_action_fired","exposeToHomeAssistant":false,"haConfig":[{"property":"name","value":""},{"property":"icon","value":""}],"x":560,"y":600,"wires":[["724f2894.7441"]]},{"id":"724f2894.7441","type":"switch","z":"6494c6f7.0a7108","name":"Notification Check","property":"payload.event.actionName","propertyType":"msg","rules":[{"t":"eq","v":"SOUND_ALARM","vt":"str"},{"t":"eq","v":"SILENCE_ALARM","vt":"str"}],"checkall":"true","repair":false,"outputs":2,"x":890,"y":600,"wires":[[],[]]},{"id":"e7f76522.c1a328","type":"server","z":"","name":"Home Assistant","legacy":false,"addon":true,"rejectUnauthorizedCerts":true,"ha_boolean":"y|yes|true|on|home|open","connectionDelay":false,"cacheJson":true}]Sending & Receiving iOS Notifications with the Automation Editor
These actionable notifications can also be used with the built in Automation editor in Home Assistant. To send a notification, the action will use the same notify service we used in the developer tools in the previous examples:

service: notify.mobile_app_stevens_iphone
data:
  message: Actionable iOS Notification - Alarm System
  data:
    push:
      category: alarm_notification
Since we had previously set up our “alarm_notification” notification category, whenever we send a notification with that category defined, we will get our actionable buttons (in our example, “Sound Alarm” and “Dismiss Alarm”). In terms of the full automation, your trigger and conditions can be up to you. For an example like this with an alarm system, a door opening or motion may be a good trigger.
Next, to actually receive the event from the actionable notification and use it as an automation trigger:
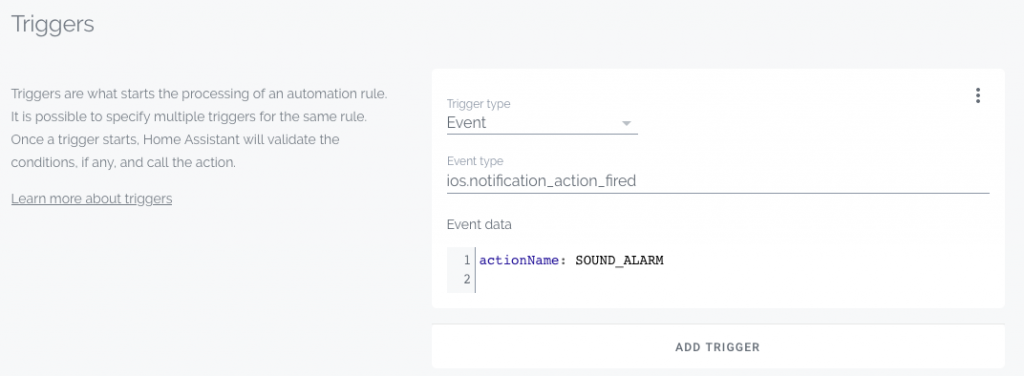
platform: event
event_type: ios.notification_action_fired
event_data:
  actionName: SOUND_ALARM
In the example above, the trigger for the automation will be the event received from the actionable notification when we push the “Sound Alarm” action in the notification. Had the actionName: been “SILENCE_ALARM”, this trigger would only run if we pushed the “Dismiss Alarm” action in the notification.
To recap, the value for actionName: comes from the action identifiers we first set when we set up the notification category, while the text on the actual buttons of the actionable notification comes from the action titles. Therefore, for our example, our identifiers used in the actionName: field for automation would be either be “SOUND_ALARM” or “SILENCE_ALARM”, while the actual button text on the actionable notification would be ‘Sound Alarm’ and ‘Dismiss Alarm’.
Conclusion
We looked at setting up basic iOS notifications and the different features available with them. We then looked at grouping iOS Notifications and some more advanced notification types such as including Dynamic Attachments. Then we set up Actionable iOS Notifications and looked at how we can use them in conjunction with both Node-RED and the Automation editor. There are several further features of the actionable notifications that are discussed here. However, this should be enough to hopefully get you started working with iOS actionable notifications.
In the next tutorial I will go over some more advanced configurations of the actionable notifications, such as critical alerts. As well, I’ll provide some more examples and use cases that I have implemented in my Home Assistant server.
In the meantime, why don’t you check out how to use Actionable Notifications from your Alexa
Great tutorial, your node red code has a Syntax error though
You’re right, thanks for catching that! Both of the Node-RED codes had one, must have been an issue when I switched the code formatting. I’ve updated the code to fix the errors.