

In my last post, I discussed how to add actionable notifications from iOS into Home Assistant. Today, we are going to add actionable notifications from our Amazon Alexa thanks to the newly updated Alexa Media Player custom component.
The author of this integration, Keaton, has a thorough ‘Getting Started‘ guide available on their Github Wiki. Check out their Github Page & Wiki for a lot of examples, features, and configuration options.
Step-By-Step Guide
First, this guide assumes you already have the Alexa Media Player custom component installed. If not, check out this link for installation instructions. If you have it installed already, make sure you are running at least version 2.7.0.
Second, this integration is new, and is receiving many updates and features (thanks to the hard work by Keaton). I am working to keep this guide updated as changes occur, but if you run into issues, I would recommend reading through the wiki to see if installation instructions have changed. Feel free to contact me if there is an issue with this tutorial.
Third, you must have external access access to your Home Assistant server to use this.
Step 1 – Adding a new text input into the input_text integration
In your configuration.yaml file, we are going to add a new input_text. Add the following entry to input_text in your configuration, and then restart Home Assistant (This entry is necessary as otherwise you will get a communication error when testing the skill.):
#Code from Keaton's github page
input_text:
  alexa_actionable_notification:
    name: Alexa Actionable Notification Holder
    max: 255
    initial: '{"text": "This is a test of the alexa actions custom skill. Did it work?", "event": "actionable.skill.test"}'
Step 2 – Creating the Custom Alexa Skill
- Go to the webpage: https://developer.amazon.com/alexa/console/ask and login with the same Amazon account that you also use for your Alexa devices.
- If you’re not already an Amazon Developer, you will be presented a page to sign up as one. You won’t need to add any payment methods:

- After sign up, we can start to create our skill! You should see this page below after the developer registration if you go back to the page, https://developer.amazon.com/alexa/console/ask. On this page, click ‘Create Skill’

- After clicking create skill, you will be presented with the page shown below where we can configure our skill. Follow the steps below:

Step 3 – Configuring the Custom Alexa Skill
Next, we have to configure the new Skill we just created. You should now see the main dashboard, shown below:

1) Configuring the Invocation & Intents
- On the left-hand sidebar, click on the JSON Editor tab
- Head to Keaton’s Github repo, and copy the full text inside the “local_en_us.json” file
- Select all the existing text, and replace it with the copied text from Keaton’s repo
- Click Build Model and wait for the build to finish

2) Account Linking
Depending on how you connect to your Home Assistant server, we may or may not need to enable Account Linking:
Option 1 – If you connect to your server with a port in the URL (e.g. https://myhomeassistant.com:8123), select the “URL with Port” option below.
Option 2 – If you do not require a port in your URL to connect to your server, select “Standard URL”.
If you are unsure, try loading your HA server in a browser without a port in the URL – if it loads you should be good to use the ‘Standard URL’ method below. Remember, this must be an externally accessible URL, if you can only connect through an IP address, than this entire integration will not work.
Account linking will not work if your Home Assistant server requires a port in the URL to connect (e.g. https://myhomeassistant.com:8123). Instead, you will need to generate a long lived access token to link your account. This is done under your user account on Home Assistant. In step 4, you will use this access token in the Token = " " section. This access token should not be kept safe and not shared.
Setting up Account Linking
These steps are only if you connect to your HA server without a port. Under the left hand side of the dashboard we should see the tab for ‘Account Linking’. Clicking it will open up this page, where we can go through the steps outlined below:

For Step 3, the lines to add (replacing ‘myhomeassistant’) are:
- Authorization URI:
https://myhomeassistant.com/auth/authorize - Access Token URI:
https://myhomeassistant.com/auth/token
And for Step 4, the URL for ‘Your Client ID’ is:
- If you are in the US or Canada:
https://pitangui.amazon.com/ - If you are in Europe:
https://layla.amazon.com/ - If you are in the UK (try either the Europe URL or this one):
https://layla.amazon.co.uk/ - If you are AU or JP is:
https://alexa.amazon.co.jp/
4) Adding the Custom Scripts
Finally, we need to copy two sections of code from Keaton’s repo: lambda_function.py and requirements.txt over to our Alexa Skill
a) Under the Alexa Developer Console, at the top header you should see a tab labeled ‘Code’. Under this tab, along the left-hand side bar, you should see lambda_function.py, requirements.txt and utils.py — We need to open lambda_function.py and requirements.txt
b) Next, head to Keaton’s, Alexa-Actions Github page, open the lambda_function.py in the repo and copy/replace the example lambda_function.py file in the Alexa Developer Console.
c) Repeat this step, now replacing the text in requirements.txt with the requirements.txt in Keaton’s repo.
Once both files are copied, open the open the lambda_function.py file:
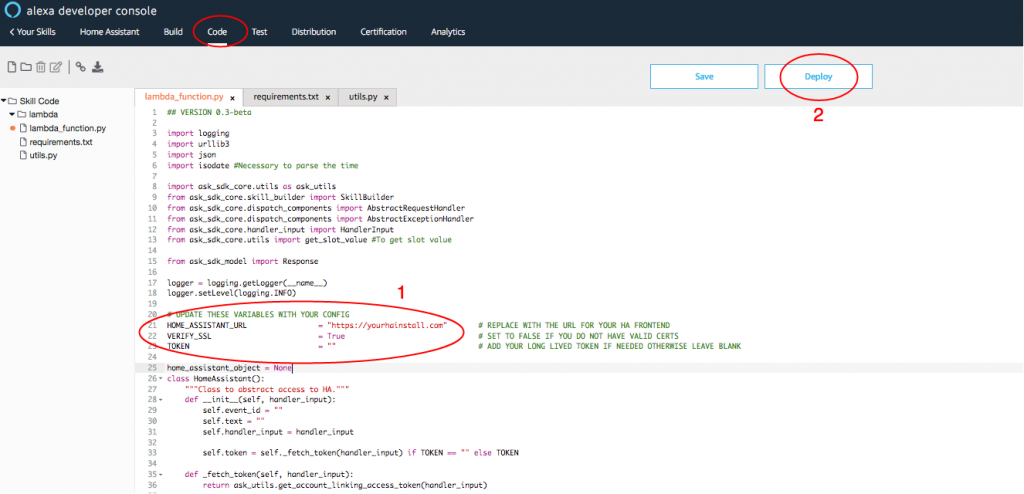
In this script, we are going to look at the three circled variables (Note: Your script may look different than the above image, depending on the version copied. However, the variables we are editing will remain the same. As of version 0.7, the variables we are editing have moved to the top of the script, lines 4, 5 & 6):
- Replace the
HOME_ASSISTANT_URLwith the URL of your HA server. This must be an externally accessible URL. There cannot be any trailing spaces nor trailing slash after your URL. A Nabu Casa URL will work after removing the trailing slash (/) - If you don’t use a valid/trusted SSL Certificate, uncheck SSL verification
- If, in the previous step, you followed the instructions when you connect to your HA server with a port in the URL (e.g. :8123), then in the Token = ” ” section, this is where you will copy the long lived access token between the quotes. Otherwise, leave this blank.
5) Adding The Skill To Alexa
Okay, final step! Adding the custom skill we created to our Alexa App. You should find it under “Skills & Games”, where you will add it and link it your Home Assistant Server:

After linking, you should be prompted with a success screen. At this point, we can test our new skill! Say to Alexa, “Alexa, open custom actions”. If configured correctly, Alexa should respond with:
This is a test of the Alexa actions custom skill. Did it work?
If you don’t get this response, double check to make sure you added the ‘input_text’ into your configuration.yaml file. If you have, and are still getting an error, it may be an issue with your SSL certificate or port. Double check that you have followed all the steps correctly. DuckDNS (without a port required in the URL) and Nabu Casa URLs should work. If it’s still not working, check out the FAQ
Configuration for Alexa Actionable Notification Automations
Automation Helper Script
First, we need to add a script to our configuration.yaml file. This script will allow us to trigger the notifications:
#Script from Keaton's github page
script:
  activate_alexa_actionable_notification:
    description: 'Activates an actionable notification on a specific echo device'
    fields:
      text:
        description: 'The text you would like alexa to speak.'
      event_id:
        description: 'Correlation ID for event responses'
      alexa_device:
        description: 'Alexa device you want to trigger'
    sequence:
      - service: input_text.set_value
        data_template:
          entity_id: input_text.alexa_actionable_notification
          value: '{"text": "{{ text }}", "event": "{{ event_id }}"}'
      - service: media_player.play_media
        data_template:
          entity_id: "{{ alexa_device }}"
          media_content_type: skill
          media_content_id: <Your Skill ID>
In the above script, you will need to replace <Your Skill ID> with your skill ID, that you can find on the page here: https://developer.amazon.com/alexa/console/ask, beneath the name of your skill, clicking on “View Skill ID”. Add this ID to the script above (in quotes, ‘ ‘), save, and reload the scripts on your HA server.

To call an Alexa actionable notification, we will use this script we added above. To test this script, open up the Developer Tools and select the activate_alexa_actionable_notification script:
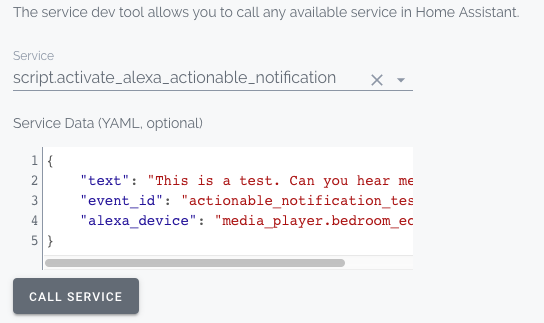
This script will require three parameters:
- “text” – What you want Alexa to announce and ask
- “event_id” – An ID you create, which will be used to identify the notification in an automation
- “alexa_device” – The Alexa device you want this notification to announce on. In the example below, replace
media_player.XXXwith the media_player representing your Alexa device.
{
    "text": "This is a test. Can you hear me?",
    "event_id": "actionable_notification_test",
    "alexa_device": "media_player.XXX"
}
Calling this service, you should hear Alexa announce the text, “This is a test. Can you hear me?”. To trigger this announcement through Node-RED, use a ‘call service’ node, with the Data the same as the code above:

Automating with Node-RED
Now, to receive the response from the Alexa, we need to set up an ‘events: all’ node and set the Event Type to: alexa_actionable_notification. Connect this node to a debug node, and then trigger the actionable notification. When you response to Alexa (yes or no), you should see an event appear in the debug tab in Node-RED:

In the event payload, we can see the event_id that we set, along with the event_response. Adding two switch nodes will let us filter this:
First, add a switch node with the Property equal topayload.event.event_id. This lets us filter for the type of notification sent, which, in our case is “actionable_notification_test”.Next, on the second switch node, set the Property toonseNone”.payload.event.event_responsewhich will let us filter for either atrue* “ResponseYes” orfalse* “ResponseNo” response (yes or no). If you do not respond, theevent_response:will be “Resp

Alexa Actionable Notification Example with Node-RED
As an example, I’ve created a simple automation to check if my front door is unlocked at 10pm daily, and if it is, notify my Alexa to ask me if she should lock it:

Conclusion
I’m sure there’s a lot of use cases for this new feature! Check if your garage door is open and ask if you want to close it. Check the house temperature and ask if the thermostat should be raised or lowered. Ask if anyone is home and wait for a response.
Let me know what you can come up with, I’d love to hear of new implementations. And, if you like this integration, check out the creators, Keaton’s, Github page for it and consider showing your support, I’m sure it would be much appreciated! There’s a lot of extra information and examples on their page!
Finally, if you’re looking to add actionable notification for your iOS device, check out my tutorial here for a step-by-step guide. Thanks!

Great tutorial. Helped me a lot. Great guy hes very nice.
Thanks Conner, appreciate it!
I had a problem with my script. My Echo is in brazilian portuguese and had not follow-up function yet.
So, when i call the script by the dev. tools, Alexa doesnt notify. I can hear the notify if i ask alexa to “Open custom actions”, so they said to me the previous phrase of my automation.
But how can i get alexa to be waken up by the script and ACTIVELY asks me?
Thanks in advance.
Someone else has this issue. It was from a formatting error in the script. Take a look at this page: https://github.com/keatontaylor/alexa-actions/wiki/FirstAction
And copy the script from there. I think that should fix the issue
Olá Luiz,
tudo bem?
Você conseguiu fazer isso funcionar? Estou sofrendo por aqui para conseguir.
Grato,
Rafael
having the same problem, alexa doesn’t activate by itself. need to say open custom actions. I’ve check the script and media player has been updated.
Check your device language. If the skill is setup in English US (the default, found on the developer dashboard in the top left) than your Alexa devices need to also be in English US (found in the Alexa app, device settings)
Hi, It seems I am almost complete with my first actionable automation but the last changes you did from True /false to ResponseYes or ResponseNo seems not working correctly for me. The output from the Notification Check node is true with any response fo yes. And the output from “Notification Response” gives nothing to the debug node nor anything is sent to the call service.
You can try moving the debug node earlier up in the flow. You could attach it right to the Alexa Notification response node to see the output. However, if you are using the latest version of the lambda function (at the time of writing this ~v0.6), then the returned responses should be ResponseYes ResponseNo or ResponseNone
Is there a way to random a text so that Alexa say different notification for every automation?
When you set up the automation you can choose what you want Alexa to say
Not that I am aware of, sorry!