Basic Notification Enhancements
The following examples will all be using the Developer Tools, Service calls. We will be calling the notify.mobile_app_xx service, replacing xx with the iOS mobile device name. If this is unclear, take a look at the first part of this tutorial!
App Icon Badges
Sometimes we may want to send a badge to the Home Assistant Companion app as an alert. That can be done by adding an entry of badge: to our notification:
{
  "message": "iOS App Badge",
  "data": {
      "push": {
          "badge": 1
      }
  }
}
This notification service call will send a message of “iOS App Badge” and update our app badge number to 1. We set whatever badge number we would like here. Additionally, if you would like to silently update the iOS badge number, without sending a notification, we can do that by setting the message to “delete_alert”. Calling the service below will result in an app that looks like this:
{
  "message": "delete_alert",
  "data": {
      "push": {
          "badge": 1000
      }
  }
}
Yikes, 1000 notifications — looks important. To clear the badges, send the notification with badge: 0
Notification Sounds
By default, iOS notifications will sound with the Tri-tone ‘ding’. You can set a custom sound by adding sound: to our notification data. There are instructions here if you want to learn about uploading your own sounds to use. However, there are many built in sounds as well. If you’ve been wanting Morgan Freeman to welcome you home, the script below will use a built in sound and do just that:
{
  "message": "Welcome Home",
  "data": {
      "push": {
          "sound": "US-EN-Morgan-Freeman-Welcome-Home.wav"
      }
  }
}
A full list of the built in sounds can be found here.
Replacing Notifications
In the previous tutorial, we talked about grouping notifications. However, we can also replace notifications as they appear. This way, rather than repeat notifications stacking up, only the latest notification will be shown. This is done by setting an, apns-collapse-id. Any notifications sent with the same id will only show the latest notifications:
{
  "message": "Motion Detected!",
  "data": {
      apns_headers: {
          'apns-collapse-id': 'motion_detection'
      }
  }
}
In the previous service call, all notifications sent with the apns-collapse-id set to ‘motion_detection’ will only show the latest notification:

Here we see multiple notifications come in, but when viewing our Notification Center, only one notification is present. Handy!
There are still a few more enhancements you can add to your notifications! This includes sending notifications to multiple devices, and controlling how a notification will display when you have the Home Assistant Companion app open. I won’t cover them in this tutorial, but they’re explained in full detail over in the companion documents. If you’re having trouble implementing, feel free to contact me on Discord and I’d be happy to help!
Actionable Notification Enhancements
The following actionable notification enhancements will require modifying your actionable notification categories, in your configuration.yaml file. If this is unclear, take a look at the first part of this tutorial!
Activation Mode
If you want the Companion app to open after sending an actionable notification, set the activation mode to ‘foreground’. If you want it to trigger the alert in the background, set the activationMode to ‘background’ (which is the default behavior):
ios:
  push:
    categories:
      - name: "Alarm Control"
        identifier: 'alarm_notification'
        actions:
          - identifier: 'SOUND_ALARM'
            title: 'Sound Alarm'
            activationMode: 'foregound'
          - identifier: 'SILENCE_ALARM'
            title: 'Dismiss Alarm'
            activationMode: 'background'
In this example, pressing the ‘Sound Alarm’ button will open the Home Assistant Companion app, while pressing ‘Dismiss Alarm’ will not.
Requiring Authentication
If you want to require your iOS device to be unlocked before allowing an actionable notification to be acted upon, you can set authenticationRequired: to true:
ios:
  push:
    categories:
      - name: "Alarm Control"
        identifier: 'alarm_notification'
        actions:
          - identifier: 'SOUND_ALARM'
            title: 'Sound Alarm'
            authenticationRequired: false
          - identifier: 'SILENCE_ALARM'
            title: 'Dismiss Alarm'
            authenticationRequired: true
In this example, even with your iOS device locked, you can send the ‘Sound Alarm‘ action. However, in order to send the Dismiss Alarm action, authentication is required. This is perfect for an alarm system, preventing someone from dismissing or disarming your alarm system without authentication (FaceID, TouchID or Passcode unlock)
Destructive Alerts
In our actionable notification alarm control example we have used a ‘Sound Alarm’ button. Depending on our connected automation, this could be a serious action. We can denote this by setting destructive: to true. This will change the button colour to red to denote a ‘destructive’ alert.
ios:
  push:
    categories:
      - name: "Alarm Control"
        identifier: 'alarm_notification'
        actions:
          - identifier: 'SOUND_ALARM'
            title: 'Sound Alarm'
            destructive: true
          - identifier: 'SILENCE_ALARM'
            title: 'Dismiss Alarm'
            destructive: false
The previous configuration will produce an actionable notification with the ‘Sound Alarm’ button highlighted in red:

As with the basic notification enhancements, there are still more enhancements you can add your actionable notifications! You can also add a text field to your actionable notifications, which will let the user enter a text response that will be sent back to Home Assistant. More details are available on the companion app documents here.
Critical Notifications
As you expand the types of sensors integrated in Home Assistant, some of these sensors & systems will produce critical notifications — Security system alarm tripped? Water leak detected? Smoke alarm sounding? Home temperature below freezing?
All of these are examples that would immediately require your attention which is where critical notifications are best used. Apple introduced them in iOS 12 and as such, your iOS device must be running iOS 12 or later.
Critical notifications are given full priority on iOS. They:
- Appear first in Notification Center regardless of Do No Disturb
- Will play a sound even if the iOS device is muted or on Do Not Disturb
- Wont disappear on their own, must be swiped away
- And, if you are using CarPlay, these notifications will even appear on the CarPlay dashboard!
To make an alert a critical notification, in the service call (i.e. not in configuration.yaml), under sound, we will add these three entries:
{
  "message": "Actionable iOS Notification - Alarm System",
  "data": {
      "push": {
        "sound": {
          "name": default,
          "critical": 1,
          "volume": 1
          }
      }
  }
}
But WAIT! Before calling this service, this example will send an alert, at full volume on you iOS device. Make sure you wont be waking anyone up as you test this. To make the alert a critical notification, critical: must be set to 1. The volume can be set to any decimal between 0 and 1. For example, to set the volume to 50%, "volume": 0.5. To turn the volume off but still make it a critical notification, set the volume level to 0.
Putting it All Together
Now, an example of combining multiple enhancements is shown below. The following example will call an actionable notification we previously defined in our configuration.yaml, called, 'alarm_notification', which defines two buttons: a destructive (red) button to Sound Alarm, and a button which requires authentication to Dismiss Alarm.
ios:
  push:
    categories:
      - name: "Alarm Control"
        identifier: 'alarm_notification'
        actions:
          - identifier: 'SOUND_ALARM'
            title: 'Sound Alarm'
            destructive: true
            authenticationRequired: false
          - identifier: 'SILENCE_ALARM'
            title: 'Dismiss Alarm'
            destructive: false
            authenticationRequired: true
The example service call will set the Home Assistant Companion app badge number to 1. And, it is defined as a critical notification, at full volume, with a built in notification sound.
{
  "message": "Critical alert!",
  "data": {
      "push": {
        "sound": {
          "name": US-EN-Morgan-Freeman-Back-Door-Opened.wav,
          "critical": 1,
          "volume": 1
          },
          "category": "alarm_notification",
          "badge": 1
      }
  }
}
If you called this service, you would have ‘Morgan Freeman’ yell at you that your back door is open — nice.
Advanced Actionable Notification Example
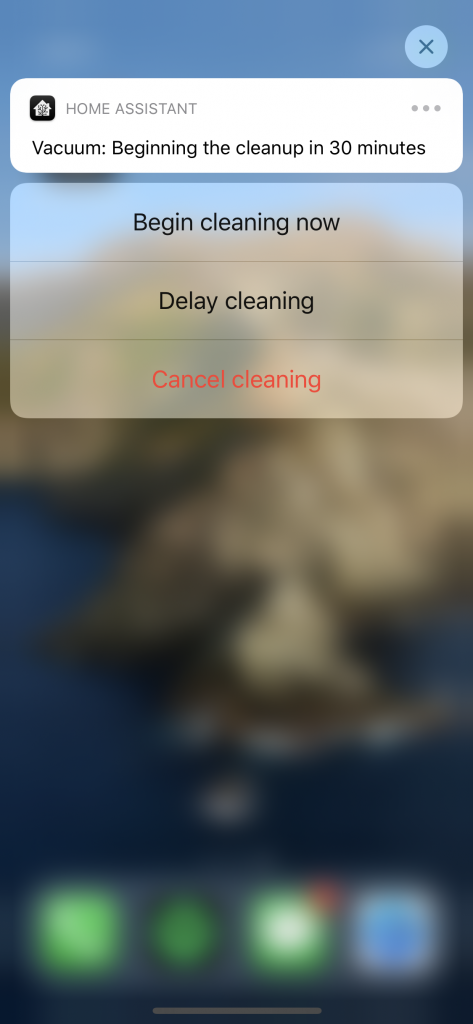
An example of an actionable notification that I frequently use is for my robot vacuum. Three times a week, I receive a push notification stating that the robot vacuum will begin cleaning in 30 minutes. The three options I am presented are, Begin cleaning now, Delay cleaning, or Cancel cleaning. This automation is relatively easily set up in Node-RED. Let me show you how:
Setting up the Notification Category
This actionable notification returns one of three options: 'CLEAN_NOW', 'DELAY_CLEAN', OR 'CLEAN_CANCEL'. Authentication is not required for any option, and the Cancel cleaning button is presented as destructive (in red).
ios:
  push:
    categories:
      - name: 'Robot Vacuum'
        identifier: 'robovac'
        actions:
          - identifier: 'CLEAN_NOW'
            title: 'Begin cleaning now'
            activationMode: 'background'
            authenticationRequired: false
            destructive: false
          - identifier: 'DELAY_CLEAN'
            title: 'Delay cleaning'
            activationMode: 'background'
            authenticationRequired: false
            destructive: false
          - identifier: 'CLEAN_CANCEL'
            title: 'Cancel cleaning'
            activationMode: 'background'
            authenticationRequired: false
            destructive: true
Creating the Service Call
This service call is relatively simple. Just a message (always required) and a call to the robovac notification category that we previous defined. Make sure to ‘Import push configuration from server’ in the Companion App in order to correctly present a newly created notification category.
{
    "message": "Vacuum: Beginning the cleanup in 30 minutes",
    "data": {
        "push": {
            "category": "robovac"
        }
    }
}
Creating the Automation
I’ve created the automation in Node-RED. I’ll link the entire flow below, and will go through and explain the various components of how it works:


- On Tuesday, Thursday and Sunday, at 12:00am, I send a push notification to my phone with the three vacuum options.
- When that notification is sent, the event node labeled ‘iOS Notification’, picks that event up, and checks to see if it was the ‘robovac’ notification sent. If it was, it sends a command to the delay node (labeled variable). This delay node is set to a variable delay, that can be set with the
msg.delaypayload. As such, as soon as the notification is sent (regardless if I interact with the notification), amsg.delaywith 1800000 milliseconds, or 30 minutes, is sent as the payload. This way, if I don’t interact with the notification, the vacuum will default to start in 30 minutes from the time the notification is delivered. - If I do interact with the notification, these events are detected by the ‘iOS Action’ node, where the responses are sorted, depending on if I click clean now, delay or cancel clean.
- If I select: Clean Now, then a
msg.flushmessage with atrueboolean payload is sent. This causes the delay node ignores any delay and immediately pushes the message through to start the vacuum - If I select: Delay Cleaning,
msg.resetis sent to clear all pending messages, and then after 1 second,msg.delayis sent with a payload of 5400000 milliseconds, or 1.5 hours, which sets the delay longer than the default 30 minutes. - If I select: Cancel Cleaning, a
msg.resetmessage with atrueboolean payload is sent, which causes the delay to clear all delayed messages, and does not send any message to the vacuum node, effectively canceling the cleaning.
If you want to check out the Node-RED automation yourself, feel free to import the code below:
Conclusion
Hopefully these iOS notification enhancements can help your Home Assistant automations! Let me know in the comments some of your notification examples. And, if you’re loving the actionable notifications, check out the newly released Actionable Notifications from Alexa to Home Assistant created by Keaton!


Hi, is there a way to repeat the sound of a notification?
The intention is to create an alarm clock. Of course, this could be achieved by either have an insane long sound file or by sending the notification over and over again but i wonder if it is possible to just repeat the sound.
Many thanks for the tutorial anyways, it’s awesome!
Ah that’s not something I’ve looked in to but it’s a good idea. I’ll look in to it and get back to you if it’s possible!